
The decision to move a file server to SharePoint is usually made for simple reasons: no hardware to maintain, storage allocated centrally, files reachable from the office and from home. But between "we're moving to Microsoft 365" and a storage system that actually works there are a few steps where it's easy to make a choice you'll regret later.
This guide walks the whole path: how to create a SharePoint site for an organization or a single department, how the document library works, how to hand out permissions inside the company and how to open something up to the outside without risk — and, most important for daily work, how people will actually open these files from their computers.
The one thing worth knowing up front: if the goal is simply to store the company's working files, the site type and the design template barely matter. Every SharePoint site gets a full document library. What matters is permissions and how people work with the files.
What a SharePoint site is, and why you need one
A SharePoint site is a workspace in Microsoft 365 that always contains at least one document library, plus pages, lists and access settings. Put simply: a site is the "top-level folder" of your organization or department in the cloud, with a web page and a set of rules about who sees what attached to it.
No matter how beautifully the site itself is designed, the file library inside it works exactly as reliably — and that library is usually the real value. So don't spend weeks on the home page if what people need is storage.
Scale doesn't change the recipe: an organization-wide site is created the same way (shared policies, templates, announcements — the things everyone sees) as a department site (finance, marketing, production — the things only that team sees). The only difference is permissions, which is exactly why many companies run both: one site "for everyone" plus a handful of departmental ones.
Team site or Communication site
When you create a site, SharePoint offers two types. The difference isn't cosmetic — it decides what else gets created alongside the site.
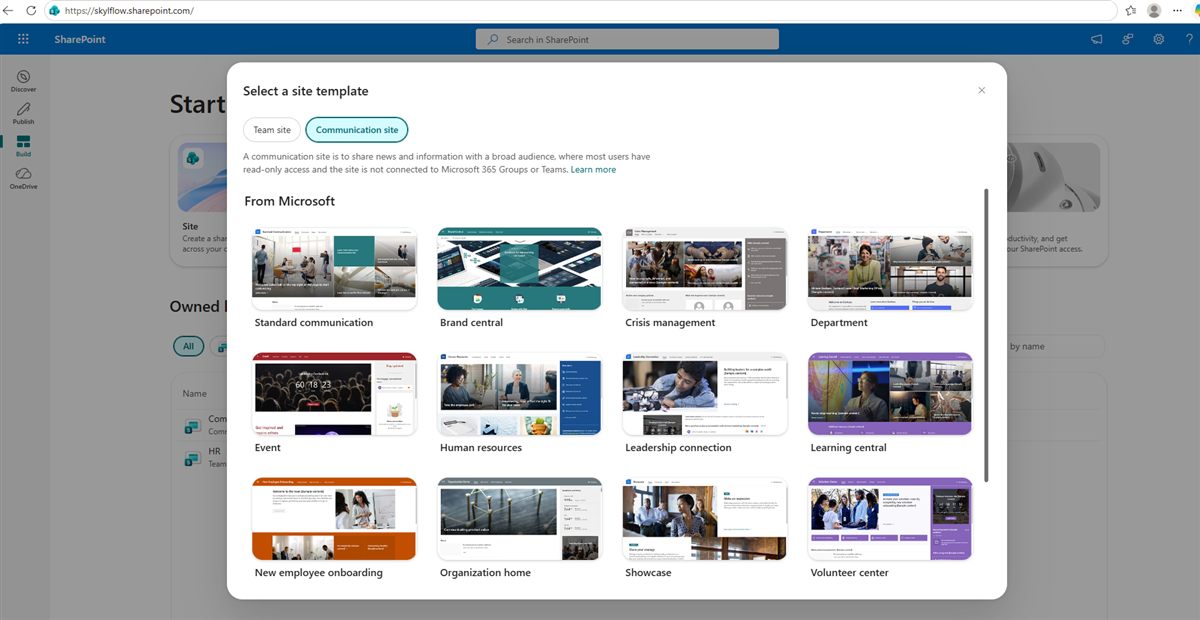
Team site
Tied to a Microsoft 365 group. It automatically gets a shared mailbox, a calendar and, if you want, a team in Teams. Built for collaboration: discussion, co-authoring documents, planning meetings. The logical choice if the department already lives in Teams.
Communication site
Not tied to an M365 group. Built for broadcasting information: news, announcements, policies, reference material. Most users have read-only access.
What if you just need file storage?
Either type works. A Communication site is often the more convenient one for this: it doesn't drag along an extra group, mailbox and calendar nobody will ever read. Fewer objects, less administrative confusion.
Creating a site from the SharePoint portal
This is the recommended route when the site address and the template matter to you.
Open https://<your-organization>.sharepoint.com → the Build section
→ the Site tile.
- Click the Site tile and pick the type — Team site or Communication site.
- Pick a design template from the gallery (or skip it — you can change it later).
- Review the preview and confirm.
- Set the name, description and site address — the part of the URL after
/sites/. This is the portal's main advantage: the address is predictable and under your control. - Click Create site.
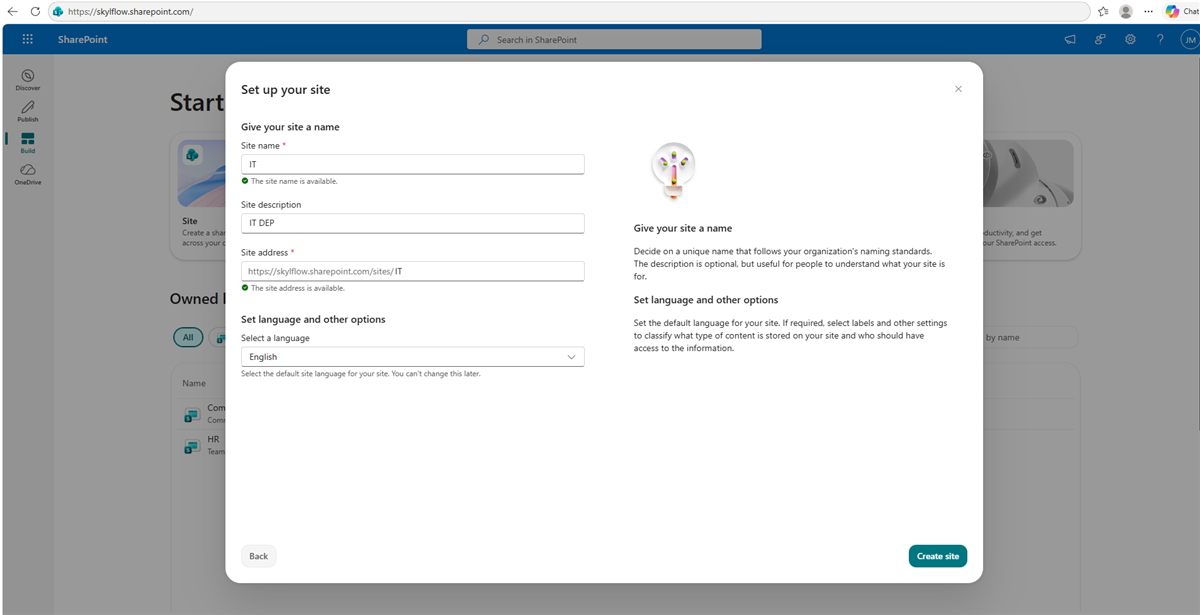
The template isn't final. On the preview step Microsoft states outright that the site template can be changed later in settings. So don't get stuck on this choice.
Creating one from Teams — fast, but with strings attached
When you create a team in Teams (or a Microsoft 365 group in Outlook), SharePoint automatically creates a site for it, document library included. There's nothing extra to do. Every channel has a Files tab, which is really a folder in that site's library — so people see the conversation and the files in one window.
This route has three consequences worth knowing in advance:
- You can't pick a template — the site is created in the format meant for working inside Teams.
- The address is generated automatically and doesn't always look sensible: if the team name is taken or contains spaces or special characters, technical characters end up in the URL.
- An M365 group comes with it — a mailbox and a calendar that often nobody needs.
So the rule is simple: if the main goal is a convenient library with a human-readable address, create the site from the portal and connect a Teams team to it later if you need one.
How much storage this takes
A common planning mistake is assuming every site gets its own terabyte. In reality all SharePoint sites within one tenant draw from a shared storage pool: a single limit for the whole organization.
- Base pool — roughly 1 TB per tenant, always allocated.
- Plus per licence — roughly 10 GB added to the pool for every user with a licence that includes SharePoint (Business Basic/Standard/Premium, Microsoft 365 E1/E3/E5).
So the rough formula is 1 TB + 10 GB × number of licences. Microsoft revises the exact numbers from time to time, and some entry-level plans grant a smaller bonus — the current figure is always visible in the SharePoint admin center under storage.
The practical conclusion: creating a new site doesn't eat a separate quota by itself. Spinning up a site per department is not something to fear — they all share one pool, and an admin can cap an individual site manually if needed.
The document library is the heart of the site
Every site is created with a default Documents library (in the classic view, Shared Documents). It's the familiar folder, with subfolders, file versioning and co-authoring.
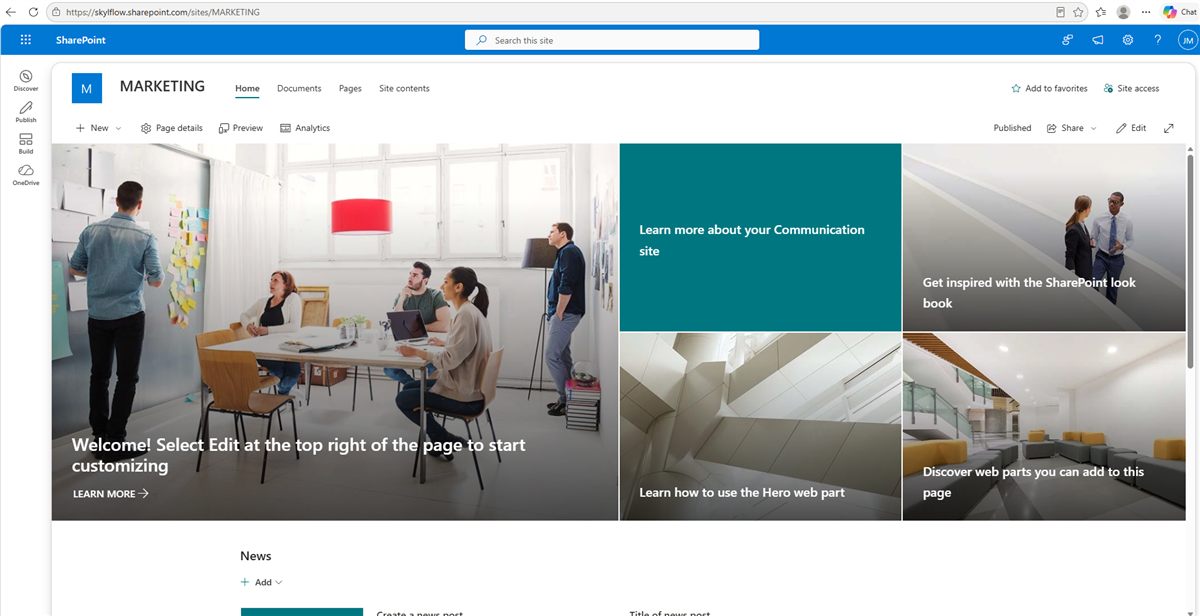
If the site exists purely as shared storage, you don't have to design the home page at all. Giving people a direct link to the library is enough — access and functionality are exactly the same.
Permissions: site, library, folder
This is the part genuinely worth your attention. Every site has three standard groups:
| Group | Level | What they can do |
|---|---|---|
| Site Owners | Full Control | Everything members can do, plus managing permissions, settings and deleting the site |
| Site Members | Edit | Add, edit and delete files and pages |
| Site Visitors | Read | View and download files only |
The most useful advice in this whole article: put an Active Directory / Entra security group into those groups, not individual people by name. Then when the department changes, you add or remove the person in that one group and permissions update across every site by themselves, without visiting each one.
How to add people to the site groups
Here's the question that comes up most often: the "Site access" panel asks for a name, and it looks like you'll have to add everyone one by one. In fact you can type a group name into that same field: an Active Directory / Entra security group or a Microsoft 365 group. That's exactly what you should do — then you change who has access in one place instead of in every site.
Two routes, depending on what suits you:
- Through the "Site access" panel (the modern view). The Site access button in the top-right corner of the site → expand the level you need — Site owners, Site members or Site visitors → add a person or a group there. Quick when you need to add one or two.
- Through the classic permissions screen — more reliable for bulk changes and for reviewing who's in: the Settings gear → Site permissions → Advanced permissions settings at the bottom. You get the list of site groups (Site name Owners / Members / Visitors). Click the group you need → New → Add users to this group — and type a security group, or several people separated by semicolons.
If the site was created from Teams: its membership is governed by the Microsoft 365 group, not by SharePoint. Add people to the team (Teams) or the group (Outlook) and permissions on the linked site update automatically. Adding them to the SharePoint groups by hand in that case creates confusion: two sources of truth instead of one.
Does access to the library equal access to the site?
By default, yes: the library inherits the same three site groups. You can see this by opening "Manage Access" on any folder — the same groups are listed there.
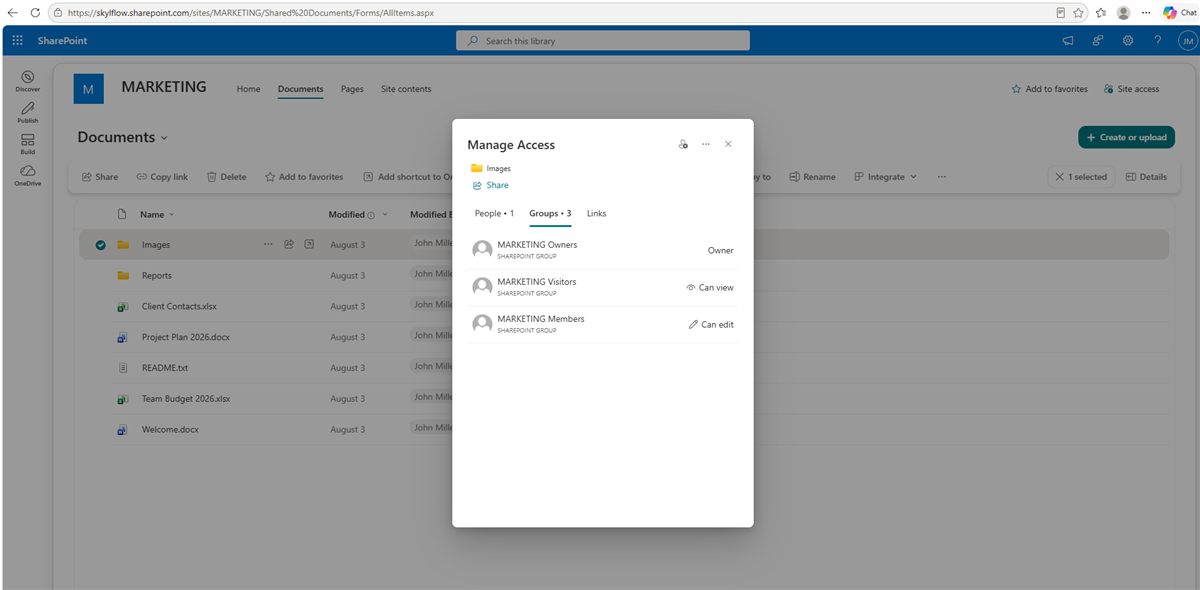
If you need a library or a single folder to have a different set of people, you break inheritance: library settings → Permissions for this document library → Stop Inheriting Permissions → then remove the groups you don't want and add the ones you do.
Access to one folder only
The classic scenario: only finance should see the "Invoices" folder, nobody else. You do that with Share on that specific folder, choosing the level — "can view" (view and download) or "can edit" (full work with the files).
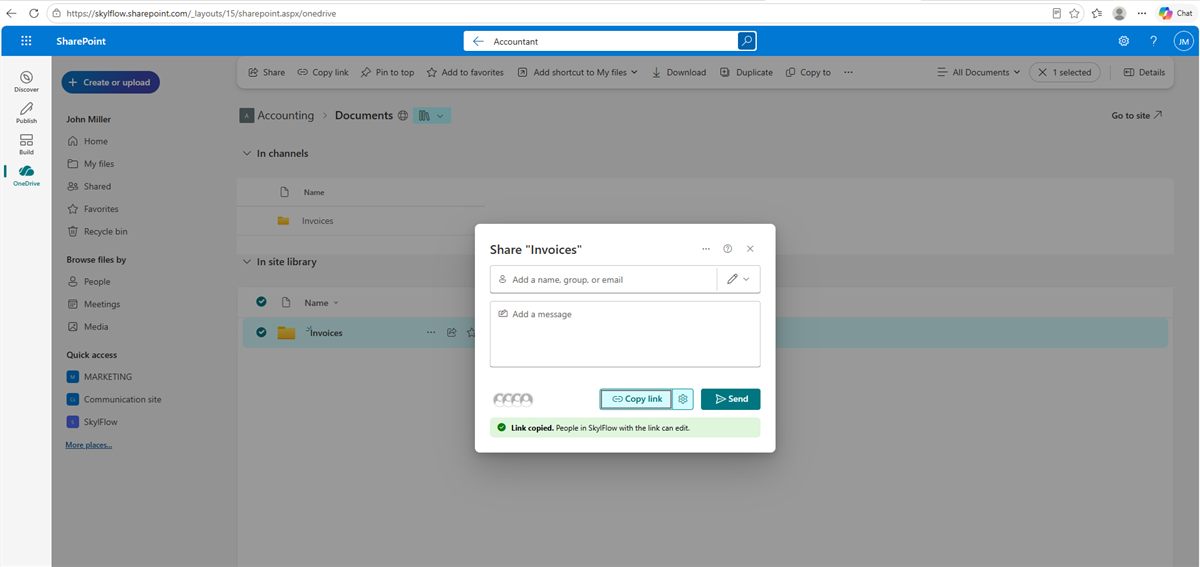
Don't get carried away, though: pinpoint exceptions are handy for one department or one partner, but unique permissions scattered across the whole library make the structure unmanageable — six months later nobody remembers who has access to what. For large permanent divisions (a "Finance" and a "Marketing" that never see each other's files) it's better to create separate sites or libraries from the start.
Internal access is the norm, external is the exception
Everything described above works inside your organization by default. That isn't a limitation, it's the classic and correct model: the site groups contain your employees, with work accounts in the same Microsoft 365 tenant. They sign in with a corporate account, your sign-in policies and multi-factor authentication apply to them, and when someone leaves you disable one account and access disappears from every site at once. That's the whole point of a corporate cloud: one person, one point of control.
External collaboration is sometimes necessary too: a contractor, an auditor, a client, a print shop. The question isn't whether to allow it, but where exactly it happens — and whether someone who shouldn't be there ends up next to your internal documents.
What "granting access to the outside" technically means
SharePoint has three different mechanisms, and they shouldn't be confused:
- Guest access. The external person is invited into your tenant as a guest and gets an account like name_gmail.com#EXT#@yourtenant.onmicrosoft.com, visible in the directory, so you can find them, review them and remove them whenever you want. This is the most manageable option.
- A link for specific people. It works for the address you specified: on opening it, the person confirms it's really them with a one-time code. Forwarding the email doesn't forward access.
- An "anyone with the link" (anonymous) link. It opens with no sign-in at all. The most convenient and the most dangerous: anyone the email or message was forwarded to can open the file, and you won't even see it happen.
An important detail: you can share to any email address — Gmail, iCloud, an address on the client's own domain. A Microsoft account isn't required: the person gets a one-time code at that same address and enters it when opening the file. So "closing external access" doesn't mean "we can't work with clients" — it only means the exchange goes through a controlled channel.
The right setup: a separate site for exchange
The temptation is understandable: there's a department site, it has the folder in question — just give the contractor access to that folder and be done. It's technically possible (through Share on the folder, as described above), but it's the worst of the working options. That folder lives inside a site full of internal documents, and then the drift begins: someone moves another file in, someone breaks inheritance, someone re-shares the link — and six months later nobody can say for certain what that outside person can see.
The healthier approach is a separate site for external exchange: small, flat, with one folder per counterparty or project. Documents are copied there for the duration of the work rather than stored there permanently. Your internal libraries stay entirely internal and never intersect with outside people.
- One audit instead of ten. To see every external party you open one site, not all of them.
- No accidental spill. A person physically cannot see anything other than what was put there.
- Easy to clean up. Project over — folder closed, access revoked, history intact.
- Different rules exactly where they're needed. Link expiry, view-only, download blocking — all switched on for one site without touching the rest.
- Internal libraries stay clean — no swamp of unique permissions nobody can untangle later.
Tenant level: closed by default
The most reliable rule works not at site level but across the whole organization. In SharePoint admin center → Policies → Sharing there are four external access levels:
| Level | What's allowed | Who it suits |
|---|---|---|
| Anyone | Anonymous links, no sign-in | Almost nobody — enable deliberately and narrowly |
| New and existing guests | Invitations to any email, confirmed by code | A workable compromise for most |
| Existing guests only | Only people already invited | When the circle of partners is stable |
| Only people in your organization | No external access at all | The cautious default |
The key rule: the tenant setting is a ceiling. An individual site can only be as strict or stricter than the tenant, never looser. Which gives you the right order of operations: set the tenant strict (Only people in your organization), then raise the ceiling for the exchange site alone. The reverse — "allow everything and restrict it somewhere" — doesn't work.
Along with that, three more settings are worth configuring; they save you from mistakes made out of habit:
- The default link type — "People with existing access" or "Specific people", not "Anyone with the link". Then the Share button doesn't create a public link in one careless click.
- An expiry date for guest and anonymous links — 30 days, for instance. Access granted once "just this time" won't live on for years.
- View-only as the default permission. Editing gets enabled deliberately, when it's genuinely needed.
And one thing people often forget: if you tighten the rules after the fact, links already issued don't disappear on their own. After changing the policy, review what's already been shared — in the admin center reports or through "Manage Access" on the libraries themselves.
How to hand a folder outside when you genuinely need to
In practice it's three steps inside the exchange site:
- On the folder you need — Share, and type the person's address (any email).
- Choose the level: can view for documents to be approved or read, can edit only if the person really has to upload or change something.
- They get an email, enter the one-time code sent to that same inbox, and see that folder only. Not the rest of the library, not the site, not organization-wide search.
Revoking is just as simple: Manage Access on the folder → remove the person or the link. One technical boundary is worth remembering too: external users work through the browser only — mapping a library to a drive letter or syncing it requires a work account in your organization. That's one more argument for a separate exchange site: the convenient everyday tool stays with your own people, and only what you deliberately put there goes out.
How people will actually open these files
The site exists, permissions are handed out — what's left is the question that decides daily work. The very same SharePoint can be opened in four different ways, and the choice has a real effect on whether the move to the cloud sticks.
1 · Browser
The simplest: a link to the library in an ordinary browser. Nothing to install, works from any computer, supports co-authoring of Office files. Perfect for occasional and external users — and awkward if someone works with files all day long.
2 · Mobile apps
SharePoint and OneDrive on a phone show the sites and libraries you have access to, with the option to mark files for offline use. Outlook lets you attach files as links rather than copies.
3 · OneDrive sync
The Sync button in the library, and it shows up as a folder in File Explorer. Files are available offline and Files On-Demand avoids downloading everything at once. It works well for a folder one person uses every day.
The trouble starts with volume. Microsoft recommends staying below 300,000 synced items — but that's a laboratory ceiling, not a working norm. In practice the limit is far lower: the client visibly tires at a few tens of thousands of files, and if many people sync the same library at once it starts dragging even sooner. So sync is a scenario for a small group with a moderate number of files, not for a company-wide shared store. What comes next is familiar to anyone who has tried: OneDrive isn't syncing with no explanation, "processing changes" running for days, OneDrive taking up a lot of disk space, and conflicted copies of the same files appearing for different people. We walked that road and wrote it up in detail.
4 · A network drive — SharePoint without sync
The library is mapped as an ordinary network drive — Z:\ under "This PC". Files aren't
copied to the computer; they're opened over the network, exactly like on the old file server. For
companies migrating off file servers this is the most familiar scenario: people work the way they did
yesterday, and paths in shortcuts and scripts stay paths. If you were searching for how to
map SharePoint as a network drive or open SharePoint in File
Explorer — this is the method you meant.
OneDrive sync or a network drive: which to choose
This is the most common question when moving from a network drive to SharePoint. Below is an honest comparison of the two approaches: the OneDrive sync client and mapping the library as a network drive (in our case, through OneMount).
| OneDrive · sync | OneMount · network drive | |
|---|---|---|
| How it looks in Explorer | A folder in the user profile | A drive letter, like familiar network storage |
| File copies on the computer | Yes — files are mirrored to disk | No — opened over the network, no disk space used |
| Offline access | Yes, for marked files | Needs a connection (office, VPN) |
| Large libraries | Ceiling ~300,000 items, lower in practice | Library size doesn't matter |
| People per library | Comfortable for a small group | The whole department — nobody holds copies |
| Apps that only open a path (accounting and ERP systems, CAD, Access databases, scripts) | Work with the local copy | Work directly with the Z:\… path |
| Office co-authoring | Yes | Yes — fully preserved |
| Familiarity after a file server | Medium — a new folder structure | High — the same experience, nothing to relearn |
| Typical user complaints | "OneDrive isn't syncing", "it's eating my disk", conflicted copies | No connection means no files; otherwise it behaves like a drive |
In short: sync wins where offline is required and a person works within a limited folder. A network drive wins on volume and headcount — when the library is shared, large, and has to open the same way for everyone.
When a drive letter is worth considering
Windows can map SharePoint as a network drive on its own, with built-in tools ("Map network drive" pointed at a WebDAV address). The problem is that this mechanism relies on a legacy authentication engine and doesn't renew the session: the drive drops in the middle of the day and the user gets "access denied". That's exactly why most companies eventually give up and go back to sync — with all the limits described above.
We built OneMount because we kept hitting that wall ourselves: it maps SharePoint and OneDrive libraries as ordinary Windows drives, keeps the session alive by itself, and doesn't copy files to the computer. Office co-authoring is preserved — two people can edit the same document, just as in the browser.
Whether you need it depends on the situation. If the team is small, the library is moderate and people are used to OneDrive — sync is enough, and that's a perfectly fine choice. But if you have terabytes of files, apps that can only open a path (accounting and ERP systems, CAD, Access databases, scripts and backups), or simply a migration off a file server where people shouldn't have to relearn anything — then a drive letter saves both time and nerves.
Sources
- Microsoft — creating SharePoint sites and site types.
- Microsoft — SharePoint Online limits, including tenant storage.
- Microsoft — restrictions and limitations in OneDrive and SharePoint (the 300,000-item sync recommendation).
Next in this series: the ways to map SharePoint as a network drive and their real limits →